how to add LTL freight rates to WooCommerce checkout
Configure product dimensions and units, connect ShipPeek, and show live LTL freight rates and accessorials at WooCommerce checkout.
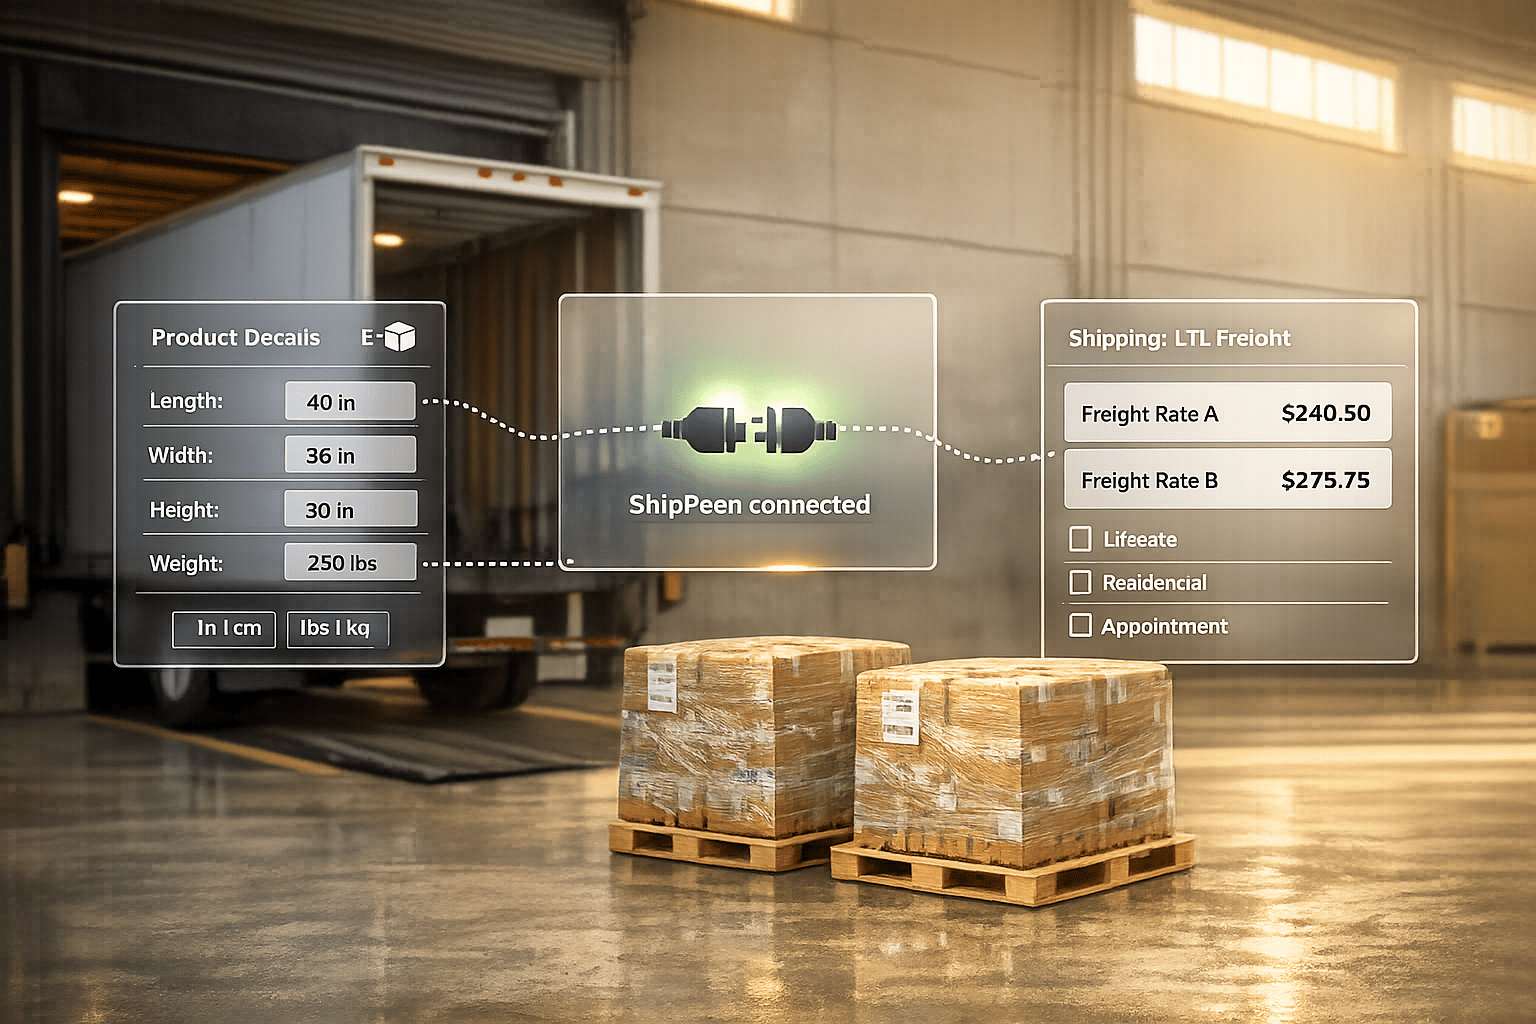
If your WooCommerce store ships heavy or oversized items like furniture or industrial equipment, adding LTL freight rates to the checkout process is a must. This ensures accurate shipping costs are calculated in real-time, avoiding unexpected fees and improving customer experience. Here’s how to set it up:
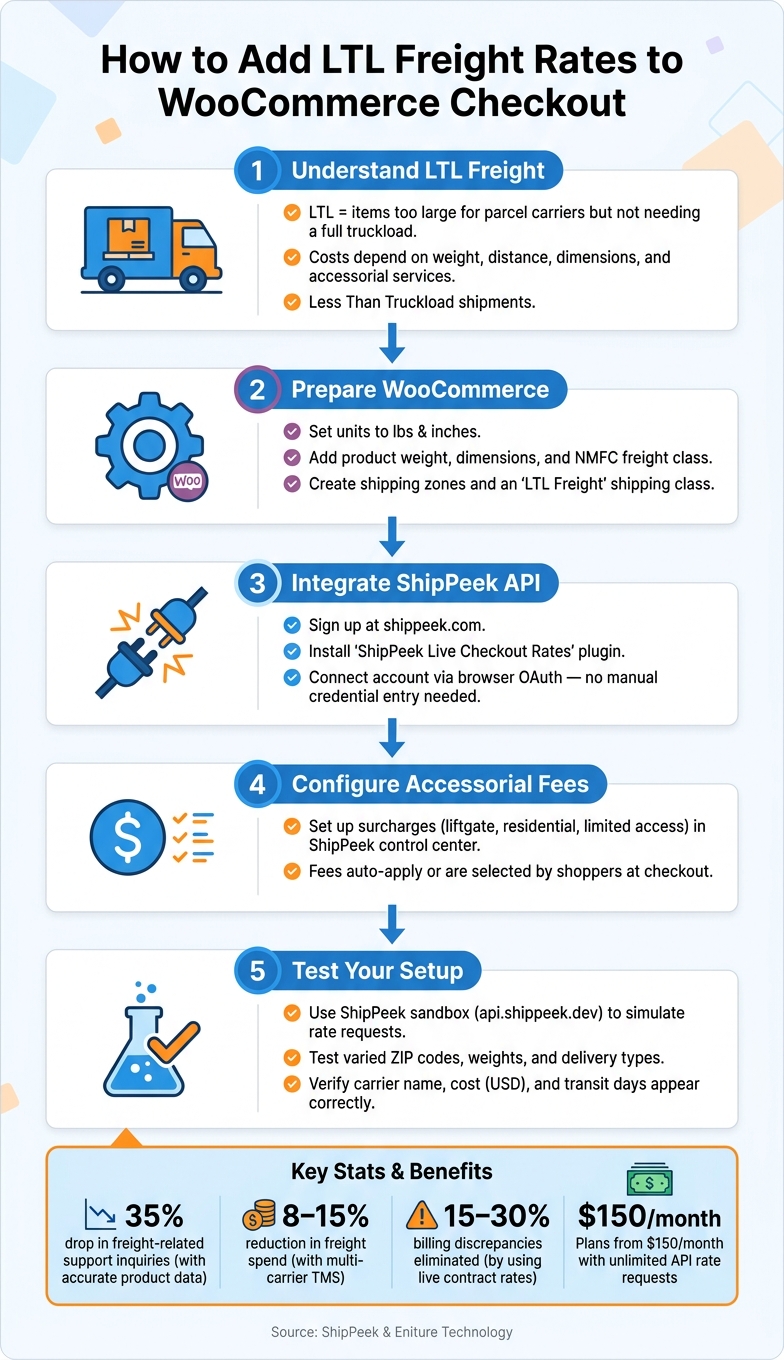
- Understand LTL Freight: LTL (Less-Than-Truckload) shipping is for items too large for standard parcel carriers but not requiring a full truckload. Costs depend on weight, distance, dimensions, and additional services like liftgate delivery or residential access.
- Prepare WooCommerce:
- Set measurement units to lbs and inches.
- Add accurate product weight, dimensions, and NMFC freight class.
- Create shipping zones and a dedicated “LTL Freight” shipping class.
- Integrate ShipPeek API:
- Sign up at shippeek.com and configure carriers.
- Install the ShipPeek Live Checkout Rates plugin in WooCommerce.
- Connect your ShipPeek account to fetch real-time freight rates.
- Set Up Accessorial Fees: Configure surcharges (e.g., liftgate or limited access delivery) in ShipPeek to reflect the total cost upfront.
- Test Setup: Use the ShipPeek sandbox environment to test rates and ensure accurate quotes for different scenarios.
LTL Freight Quotes for WooCommerce - Setup Tutorial & Demo
sbb-itb-8138a00
Preparing WooCommerce for LTL Freight Integration
Getting your WooCommerce store set up properly is essential to avoid API errors and inaccurate shipping quotes. Follow these steps to configure your store for LTL freight integration.
Configuring Store Details and Measurement Units
First, navigate to WooCommerce > Settings > General and ensure your base location is set correctly. This step is crucial for generating accurate rate quotes. Next, head over to WooCommerce > Settings > Products and confirm that the weight unit is set to lbs and dimensions are measured in in (inches). Using imperial units is critical - if your store is configured to use kilograms or centimeters, the API calls might fail or result in incorrect pricing.
Once these general settings are in place, you can move on to setting up shipping zones and classes to handle LTL shipments.
Setting Up Shipping Zones and Classes
Under WooCommerce > Settings > Shipping, create a shipping zone specifically for U.S. domestic shipments. You can assign it to specific states or apply a nationwide rule, depending on your needs. WooCommerce will match customers to the first applicable zone, so organize zones logically.
“Shipping zones are the foundation for most shipping configurations in WooCommerce. How you configure your shipping zones determines the shipping options and rates customers see.” - WooCommerce Documentation [6]
Next, create a dedicated shipping class under WooCommerce > Settings > Shipping > Shipping Classes. For instance, you might name the class “LTL Freight.” This class will help your freight plugin distinguish between products requiring LTL rate calculations - like a 400 lb. industrial pump - and smaller items that ship via standard parcel services.
Adding Product Dimensions and Weight for Freight Accuracy
To ensure freight quotes are precise, all products in your store should have their weight, length, width, height, and NMFC freight class recorded under the Product Data > Shipping tab. Using imperial units is essential here as well. Double-check that this data is up-to-date for every product.
Assign each LTL product its NMFC freight class - a standardized number from the National Motor Freight Classification (NMFC) system. Carriers use this classification, which is based on density, to calculate shipping costs. Here’s a quick reference:
| Freight Class | Density (lbs/ft³) | Common Examples |
|---|---|---|
| 50 | 50+ | Steel, heavy machinery [7] |
| 70 | 15–22.5 | Machine parts, boxed engines [7] |
| 100 | 9–10.5 | Wine cases, boat covers [7] |
| 150 | 6–7 | Furniture, plastic tubing [7] |
| 250 | 3–4 | Light fixtures, bamboo furniture [7] |
If you’re unsure of a product’s NMFC class, calculate its density by dividing the weight by the volume. Don’t forget to include the weight of the pallet - typically an additional 30–50 lbs - and use the standard pallet size of 48×40 inches when entering dimensions. Carriers base their charges on the full handling unit, not just the product itself.
“To ensure the most accurate quote possible, make sure that every product has a weight, dimensions and a freight classification recorded.” - Eniture Technology [3]
Accurate product data not only ensures correct shipping quotes but also protects your profitability. For instance, a U.S.-based WooCommerce store specializing in industrial air compressors (weighing 180–600 lbs) avoided costly carrier reclassification fees by entering precise freight classes and pallet configurations. This adjustment led to a 35% drop in freight-related support inquiries within three months [5].
Integrating ShipPeek LTL API with WooCommerce
Once your WooCommerce store is up and running, it’s time to integrate the ShipPeek LTL API. This will enable live carrier rates to display automatically during checkout.
Creating a ShipPeek Account and Getting API Credentials
Start by heading over to shippeek.com to create an account. You can activate a 7-day free trial, which grants access to real-time LTL rates and complete API functionality. This trial period is perfect for testing the integration before committing to a subscription.
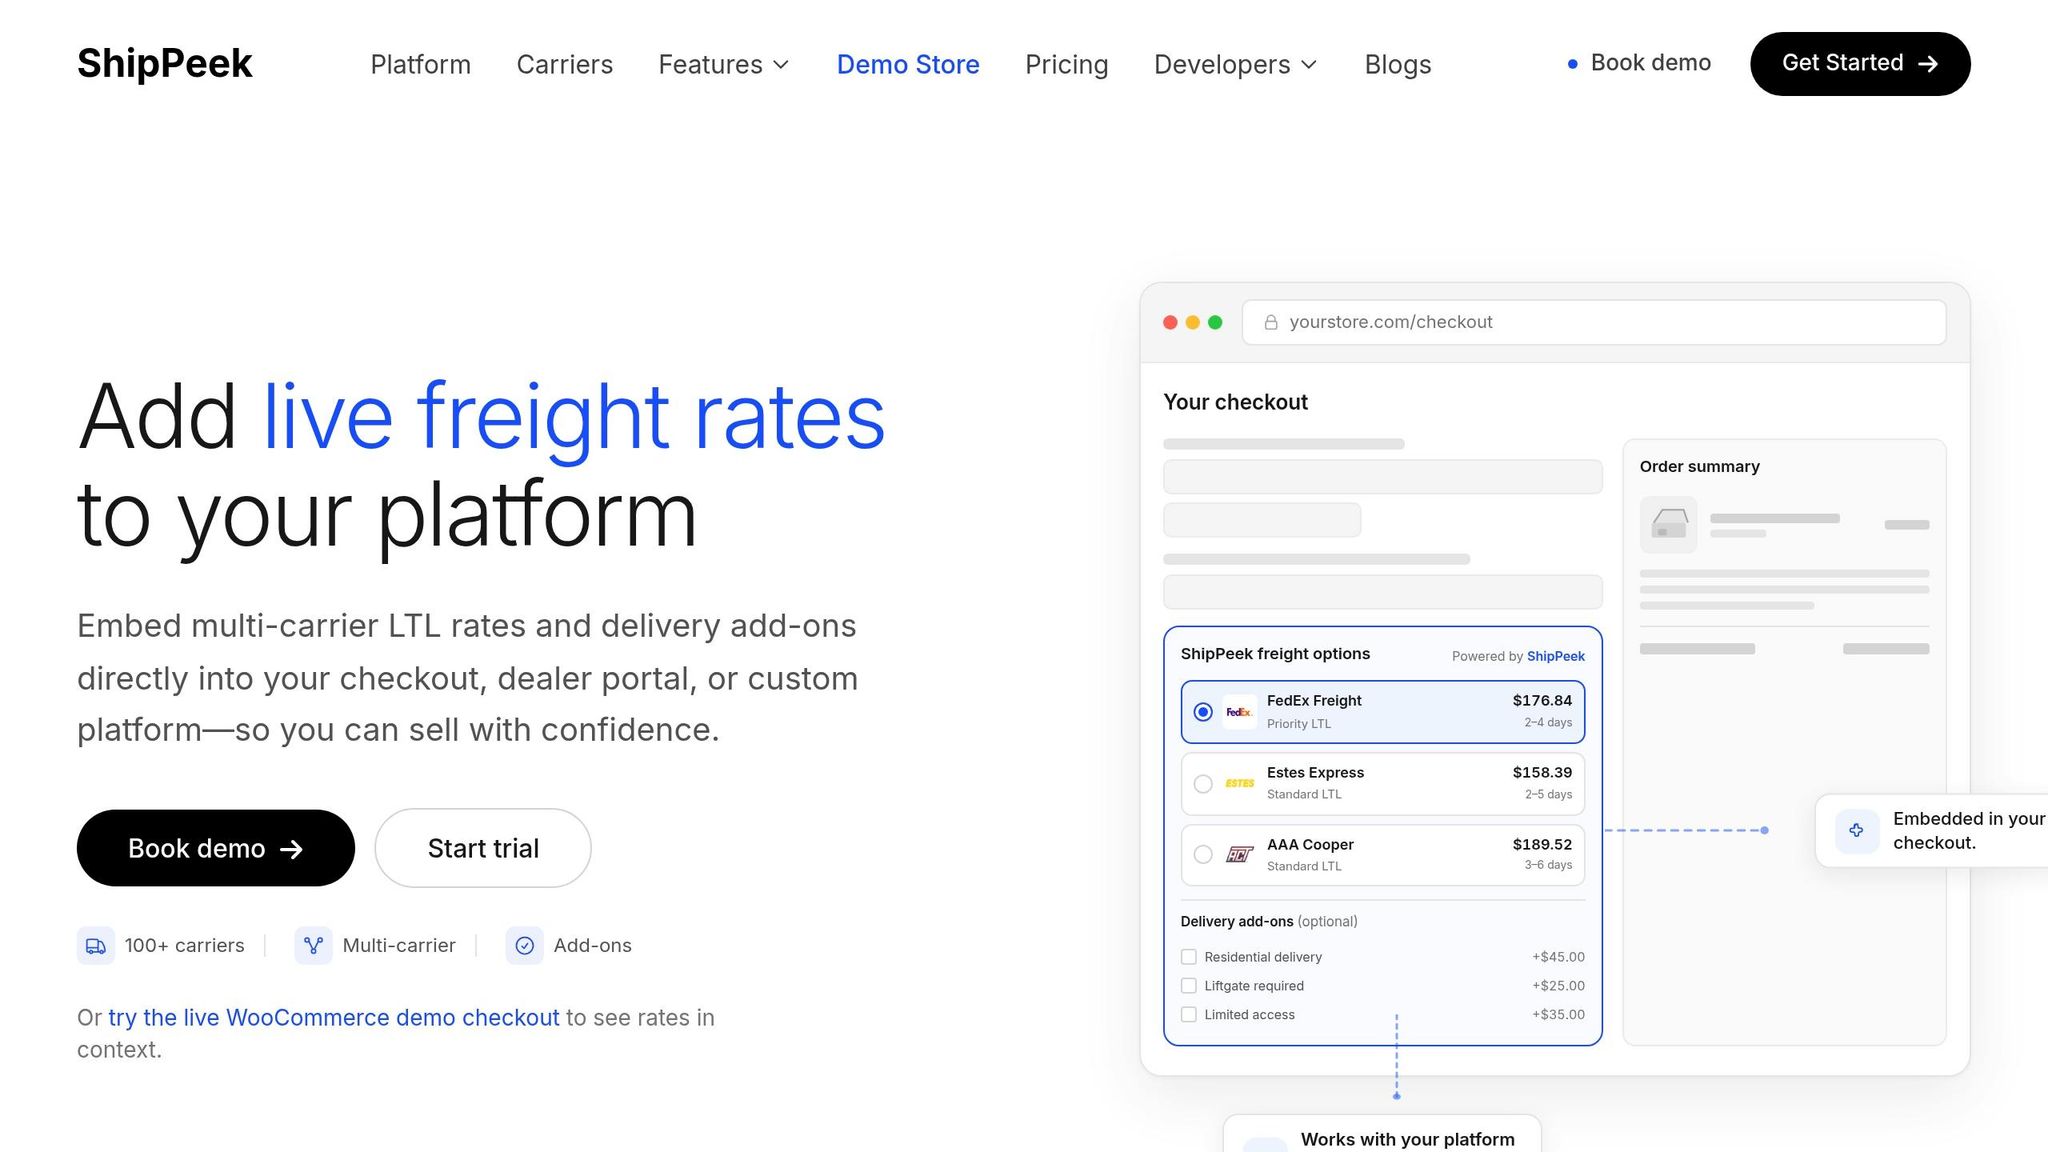
After your account is active, you’ll need to add at least one carrier in the ShipPeek dashboard. Options include Estes Express Lines, FedEx Freight, Saia, or XPO Logistics. Without configuring a carrier, the API won’t return rates. With support for over 100 LTL carriers [4], you can choose those that align with your existing contracts.
Your API credentials, formatted as client_id.client_secret, can be found in the ShipPeek dashboard [8]. If you’re using the plugin’s browser connect flow, you won’t need to copy these manually, but knowing where they are is helpful if you ever need to rotate them.
Once your ShipPeek account is ready, move on to integrating the plugin with your WooCommerce store.
Installing and Configuring the ShipPeek Plugin
To begin, download, install, and activate the “ShipPeek Live Checkout Rates” plugin via WordPress > Plugins > Add New > Upload Plugin [1].
Once activated, navigate to the plugin settings in your WooCommerce admin and click “Connect ShipPeek.” This action redirects you to the ShipPeek login page. After logging in, you’ll be automatically redirected back to WordPress with a connection code - no need for manual credential entry [1]. This secure setup ensures that your carrier contracts and surcharge logic remain protected within ShipPeek.
A key benefit: If your WordPress site is ever compromised, you can immediately revoke access by rotating your primary API key in the ShipPeek dashboard [1].
ShipPeek provides two integration environments. Use the Production environment for live rates and the Sandbox environment for testing purposes. Testing is available 24 hours after setup [9].
| Environment | Base URL | When to Use |
|---|---|---|
| Production | https://api.shippeek.com | For live stores with real carrier rates [9] |
| Sandbox | https://api.shippeek.dev | For testing before going live [9] |
With the plugin successfully connected, you can now configure your origin and warehouse details.
Entering Origin and Warehouse Details in ShipPeek
All origin data is managed within the ShipPeek app, keeping your shipping policies and carrier credentials separate from your WordPress storefront. At a minimum, you’ll need to input your origin ZIP code, company name, address, city, and state [2].
Make sure to set the originType correctly. For a commercial warehouse, use business dock, and for a home-based operation, select residential. This ensures the rates displayed at checkout align with final carrier invoices. Incorrect settings can lead to billing discrepancies of 15–30% - a problem that real-time API integration is designed to avoid [4].
For businesses with multiple shipping locations, ShipPeek allows you to save each warehouse as a reusable address template. This feature simplifies managing multiple origins across various carriers [4].
Enabling and Testing LTL Freight Rates at Checkout
Adding LTL Shipping Methods to Shipping Zones
Once your ShipPeek account is linked and warehouse details are saved, the next step is to activate LTL rates in WooCommerce’s shipping zones. Head to WooCommerce > Settings > Shipping, pick the relevant zone, and add the ShipPeek LTL shipping method. After it’s added, the plugin automatically fetches live carrier rates for orders shipping within that zone.
You can also customize the label customers see at checkout. Options like “Freight Delivery” or “LTL Shipping” work well. Additionally, you can set specific conditions, such as a minimum weight requirement, to ensure the LTL option only appears for orders that qualify for freight shipping instead of standard parcel delivery.
Configuring Accessorial Fees and Rate Display
One standout feature of the ShipPeek integration is how it handles accessorial charges. Instead of surprising customers with hidden fees later, the checkout process allows them to choose necessary delivery services - like liftgate or residential delivery - before the final rate is displayed.
“Merchants control surcharge policy in ShipPeek while shoppers only see final shipping prices.” - ShipPeek
You can configure all accessorial fees in the ShipPeek control center. This setup ensures that internal costs, like surcharges, don’t accidentally get passed on to customers. Charges for specific destinations - like farms, schools, or construction sites - are automatically applied based on the delivery address, so you don’t need to set them up manually.
| Accessorial | How It’s Applied |
|---|---|
| Liftgate delivery | Selected by shoppers during checkout |
| Residential delivery | Automatically detected or chosen by the customer |
| Limited access (farm, school, etc.) | Automatically applied based on destination type |
| Inside delivery | Managed through the ShipPeek app |
Once these configurations are in place, it’s time to test them to ensure everything works as expected.
Testing LTL Rates with Sample Orders
After setting up shipping methods and accessorial fees, test your LTL integration using sample orders. ShipPeek provides a sandbox environment (https://api.shippeek.dev) where you can simulate rate requests without affecting live shipment data. Sandbox access becomes available 24 hours after adding a carrier.
Test a variety of scenarios by changing destination ZIP codes, toggling between business and residential delivery locations, and adjusting product weights and dimensions. A successful test should return the carrier name, total cost (in USD), and estimated transit days. If the rates seem inaccurate, double-check your WooCommerce product details - errors in dimensions or missing packaging weights can lead to incorrect quotes.
For additional insights, explore the public ShipPeek WooCommerce demo store to see exactly how rates and accessorial options appear to customers. This can help you fine-tune your setup before rolling it out on your own site.
Optimizing Your LTL Freight Setup for Efficiency and Cost Control
Using ShipPeek’s Automation Tools for Shipping Management
ShipPeek streamlines your shipping process by combining rate shopping, booking, Bill of Lading (BOL) generation, and shipment tracking for over 100 carriers - including FedEx Freight, XPO Logistics, Estes Express Lines, and Old Dominion - into one easy-to-use dashboard. Forget the hassle of juggling multiple portals. ShipPeek also offers unlimited API rate requests at no extra charge, meaning your quoting costs remain steady whether you’re handling 50 orders a month or 5,000.
For businesses on the Premium plan ($750/month), there’s even more to gain. This plan includes tools for dispatch and load management, exception queues, and freight analytics. These features help pinpoint underperforming lanes or carriers, allowing you to make smarter shipping choices. By automating these tasks, ShipPeek not only simplifies operations but also helps maintain your profit margins.
If your store deals with recurring shipments, you can save frequent shipping lanes as templates in the ShipPeek workspace. This small adjustment can significantly cut down on manual data entry and speed up the booking process.
“Companies using multi-carrier TMS platforms typically reduce freight spend by 8–15% through better rate visibility and carrier competition.” - ShipPeek [4]
Adding Handling Fees and Markup to LTL Rates
Efficiency is only part of the equation - protecting your margins is just as critical. ShipPeek’s control center allows you to apply handling fees or percentage markups directly to carrier rates before customers see them at checkout. This ensures that the shipping price customers pay includes your markup, all while keeping the process seamless behind the scenes [1].
One standout feature? ShipPeek pulls live contract rates directly from carrier APIs, not estimates. This means the price shown at checkout matches the invoice you receive. Why does this matter? Industry data reveals that estimated rates can lead to billing discrepancies of 15–30% on LTL shipments [4], quietly eating into your profits over time. ShipPeek helps eliminate that risk.
Keeping Product Data Current for Accurate Rate Quotes
Accurate LTL rate quotes depend on precise product data. Key factors like weight, dimensions, freight class (NMFC code), and package type all play a role in determining shipping costs. If these details are outdated or missing in WooCommerce, the rates shown at checkout can be wildly inaccurate.
| Required Data Field | Why It Matters |
|---|---|
| Weight | Drives linehaul and fuel surcharge calculations |
| Dimensions (L × W × H) | Impacts density and pallet space requirements |
| Freight Class (NMFC) | Ensures correct pricing category for the shipment |
| Package Type | Identifies whether it’s a standard pallet (e.g., 48×40) or a custom crate |
Also, make sure your origin and destination types are correctly set in ShipPeek to avoid unexpected accessorial fees. Testing new products in the ShipPeek sandbox (https://api.shippeek.dev) is a great way to validate rates before going live. Conducting a quick audit every few months - especially after repackaging products or making warehouse changes - can help prevent misratings and surprise charges.
Conclusion and Key Takeaways
To integrate LTL freight rates into WooCommerce checkout, follow a structured process. Begin with accurate product data - ensure weights, dimensions, and freight classes are correct. Next, set up your shipping zones properly. After that, connect ShipPeek using a browser-based OAuth flow. Once integrated, manage all carrier credentials, surcharge rules, and accessorial policies through the ShipPeek control center instead of WordPress. This setup streamlines the process, improving checkout accuracy and enhancing the customer experience.
Before launching, test sample orders in the ShipPeek sandbox. This step ensures that fees for services like liftgate and residential delivery are applied correctly at checkout. A well-executed setup not only prevents errors but also delivers measurable savings. Businesses using multi-carrier TMS platforms often see freight costs drop by 8–15% due to better rate visibility and increased carrier competition [4]. With ShipPeek’s paid plans - including unlimited API requests starting at $150/month - your quoting costs remain consistent, whether you’re processing 50 or 5,000 orders.
“Using live contract rates eliminates billing discrepancies that can reach 15–30%.” [4]
Keep in mind that accurate product data and thoughtfully configured shipping zones are the backbone of this integration. When accessorials are set up correctly and live rates are utilized, your customers will encounter transparent pricing during checkout - avoiding surprises for them and protecting your profit margins.
FAQs
How do I handle orders with both parcel and LTL items?
With the Shippeek WooCommerce plugin, you can handle orders that include both parcel and LTL (less-than-truckload) items seamlessly. This plugin integrates with your Shippeek-linked carrier accounts to provide live shipping rates tailored to the contents of the cart. At checkout, customers receive accurate, real-time pricing for their entire order - whether it’s palletized freight or smaller package shipments.
What should I do if checkout rates look wrong or too high?
If your checkout rates appear off or unexpectedly high, it’s time to take a closer look at your setup in the ShipPeek control center. Start by verifying your credentials, carrier configurations, and surcharge policies. Make sure details like origin, destination types, and accessorials are correct, as these factors directly influence pricing. You can also dive into the rate breakdown - components like linehaul, fuel, and accessorial charges - to identify what’s contributing most to the total cost. This detailed review can help you spot and address any discrepancies.
How can I add a handling fee or markup to LTL rates?
To include handling fees or markups in your LTL rates, you'll need to adjust the surcharge settings in the ShipPeek control center. These settings allow you to calculate shipping prices accurately at checkout while keeping your internal markup details private. Once configured, the WooCommerce plugin will automatically apply your surcharges to the displayed rates. This helps you maintain control over your logistics margins while ensuring a smooth checkout process for your customers.